


This article outlines the steps for inviting respondents to participate in a questionnaire via email.
It provides an overview of sending invitations and reminders via email, selecting and filtering samples, and configuring email templates and links, with detailed instructions on some of these topics provided in this article and others explained in separate articles.
All the necessary steps are described below, beginning with the mail template.
Step 1: The invitation template
An approved template is required to send emails. Detailed instructions on creating and filling mail templates are provided here. For the initial mailing, an invitation template is required, while other templates are needed for different purposes.
Step 2: Send a test email
A test e-mail can be sent via the Approach templates section, as well as via the Approach respondents tab in the Sample management section of Survey Admin. The first option is mainly used to review and approve the template itself.
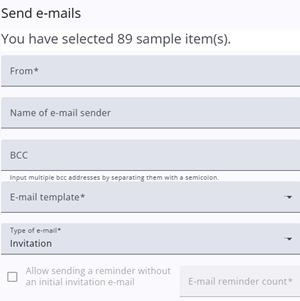
The second option uses real samples. Select one or more samples (or all samples) and click the Send test e-mail icon or button. A pop-up window (see the image in the first paragraph) will appear, where additional information can be entered. The fields in this pop-up window are described in the table below, the table contains also some fields that appear when sending normal e-mails to respondents.
Note: It is possible to filter specific samples in the table when a particular group of samples is needed for the test e-mail. For test e-mails, it is not necessary to select samples; if none are selected, the system will treat this as if all samples have been selected.
| Field | Description |
| From | Specifies the e-mail sender address. |
| Name of e-mail sender | Specifies the name of the sender. |
| Alternative e-mail | Used for test e-mails; messages are sent to this address. |
| BCC | Specifies a blind carbon copy (BCC) recipient for the email. |
| E-mail template | Selects the e-mail template. For test e-mails, all project templates are available; for actual mailings, only approved templates can be used. |
| Type of e-mail | Specifies whether the e-mail is an invitation or a reminder. |
| Allow sending a reminder without an initial invitation e-mail | When enabled, reminders can be sent without a prior invitation. |
| E-mail reminder count | Specifies which reminder is being sent (e.g., first, second). |
| Amount of random samples Percentage Send to every x-th person | These three options allow sending e-mails to a subset of the sample. |
Step 3: Send emails
It is not required to send test e-mails first; it is also possible to send e-mails to respondents without this step. This can be done by selecting all samples, or by selecting a subset (with or without filtering), and clicking either the Send e-mail button or icon.
In both cases, a pop-up window appears where additional information can be entered. This is the same window as described in the previous step; however, only approved templates are available in the template list.
Step 4: Check approach logs
After emails have been sent to respondents, the results can be reviewed in the Approach logs. This table provides an overview of key metrics, such as the number of samples and bounced emails, along with other relevant information.
It is recommended to review these logs after sending each batch. For more information, refer to the section on Approach logs.
Step 5: Create reminders
Automatic reminder e-mails can be scheduled for respondents who have not yet completed the questionnaire, with multiple reminders configured using different e-mail templates and mail counts. Reminders can be created by clicking the reminder icon. More information can be found here.