


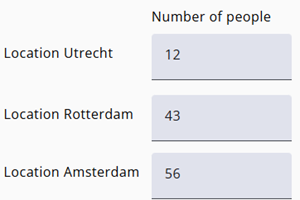
A Repeating Numerical Question grid is used to present the same question multiple times in a structured format.
For example, it can be used to ask for the number of people at different locations. Only the items relevant to each respondent—based on the sample—are displayed.
Many rows can be included, but only a single answer column is supported.
The construction of a single-select grid involves a few steps, which are described below.
A Range node is automatically created when the type of grid is selected. If the setup is canceled, the node can be removed by pressing Cancel and Remove.
Step 1: Set the properties
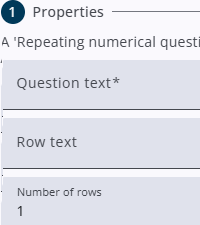
At the first step three properties have to be set.
Question text refers to the text displayed above the input fields (the second column). In the image above, this is Number of people.
Row text serves as the prefix for the text in the first column, such as Location. This prefix is then followed by a value from the sample.
Number of rows defines the maximum number of possible rows. Note that not all rows may be visible—visibility depends on the sample values. This number also determines how many variables will be created, which are used to control row visibility.
Step 2: Node names
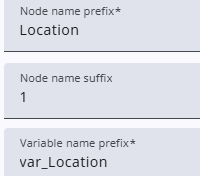
At the end of the process, the system creates QuestionGroup and Number nodes. In Step 2, the names of these nodes can be configured.
The name of each question group starts with the value entered in Row text in the previous step, followed by _QuestionGroup_ and the assigned ID.
The name of the child node—the actual question node—starts with the value entered in the Node name prefix field, followed by the corresponding suffix value.
Additional variables are also created, with names that start with the value entered in the Variable name prefix field (in this case, var_Location). This value is prefilled by default but can be adjusted if needed.
Step 3: Example
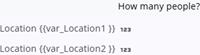
The final step in the wizard provides a preview of the setup. The placeholders (shown in curly brackets) are replaced by the corresponding variable values.
Step 4: The variables
The system also creates a variable for each possible row, automatically assigning it a value from the sample—for example, s[‘location’]. It is important to verify that these variables correctly reflect the actual values in the sample.
The result: Questionnaire
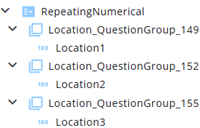
The Variable nodes, as well as the QuestionGroup and Number nodes, are created once the Confirm button is pressed.
Each question group is assigned a visibility expression, ensuring that only the rows relevant to the respondent are displayed.
See also the image in the previous step: the text of the first QuestionGroup is Location{{var_Location1}}, and the question text of Location1 equals How many people?
The result: Respondent
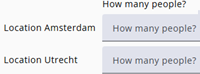
The respondent sees the placeholders replaced with actual values—such as Amsterdam and Utrecht in the image on the left—along with a numerical input field for each location.
The number of visible rows may vary depending on the sample values; for example, some respondents may not see certain rows, such as the first one.